Leg Strength First: 10 Moves to Stay Steady With Age
Summary
Legs often weaken early with aging, and the real danger is not just smaller muscles, it is slower balance, coordination, and reaction time. This video’s approach treats leg training as a fall prevention plan: build strength, practice balance under control, and use progressions that match your current ability. You will learn 10 exercises, from calf raises and chair squats to step-ups and lunges, plus form cues like keeping knees and toes aligned and loading the heels. The goal is simple: train the muscles and the brain together, safely, and consistently.
A quick story: the Olympic lunge mindset, scaled for real life
The expert closes with a vivid memory from training for the Olympics: lunges were such a staple that he sometimes loaded them extremely heavy, even joking about doing lunges with a 250-pound shot putter on his back.
You do not need anything like that to benefit.
The point of the story is motivational and practical. Legs respond to progressive challenge, and the challenge can be scaled. Bodyweight, a chair, a wall, a stair, or a light dumbbell can be enough to start rebuilding strength and stability that many people quietly lose with age.
This article follows the video’s unique perspective: leg training is not only about bigger muscles. It is about keeping the whole movement system sharp, including balance, coordination, and reaction time, so everyday life stays safer.
Why legs “weaken first” and why that matters for falls
Legs are often one of the first muscle groups to weaken with aging, especially if daily life becomes more sedentary.
What makes this dangerous is the chain reaction described in the video: weaker legs often travel with reduced balance, poorer coordination, and slower reaction time. Put those together and the risk of falling rises.
Falls are not just inconvenient. The video highlights a hard reality: in older adults, falls are a leading cause of traumatic death, and when osteoporosis is present, a fall can lead to a hip fracture with devastating downstream effects.
A hip fracture can change everything in a week. Pain and immobility can lead to rapid deconditioning, loss of independence, and complications that are harder to recover from as we age.
This is why the approach here is proactive. Instead of waiting until standing from a chair is hard or stairs feel risky, the goal is to train the specific capacities that keep you upright.
Did you know? Research summarized in a review links lower-limb power and strength with functional performance in older adults, including tasks like rising from a chair and walking speed, which are closely tied to independence and fall risk (NIH review on leg power and functionTrusted Source).
The video’s framework: strength plus balance plus coordination
Many leg programs focus on muscle burn alone. This video frames the problem differently: your legs are not just motors, they are part of a timing network.
The key insight is muscle plus signal. Movement depends on the brain sending precise signals to muscles, and the timing of those signals down to the millisecond influences coordination and reaction time.
That is why the exercise list includes both classic strength moves (squats, lunges) and “neuromuscular” moves that force the body to stabilize (single-leg calf raises, step-ups with knee drive, walking lunges with opposite arm swing). Even toe and heel walks are presented as more than a calf workout, they are balance practice.
The video also makes a simple physiological point: exercise is a controlled stress. It breaks down some muscle fibers, then the body rebuilds them during rest, assuming you have adequate nutrition to supply the raw materials.
What the research shows: A scoping review of foot and ankle strengthening exercises describes how targeted strengthening can improve function and support the kinetic chain, which matters because the foot and ankle are your first contact points for balance and gait (NIH scoping reviewTrusted Source).
Before you start: safety, setup, and the form cues that protect joints
This routine is designed to be adaptable. You can do all 10 exercises in one session, or pick a few and rotate them.
Start with the version you can do with good form.
The three form cues repeated throughout the video
These cues show up again and again because they reduce strain and improve quality.
How to make the routine safer instantly
A few environmental tweaks can change the risk profile dramatically.
Pro Tip: For balance-challenging moves (single-leg calf raises, step-ups with knee drive, lunges), stand near a wall or sturdy counter so you can “catch” yourself with fingertips without fully leaning.
Exercises 1 to 4: calves, squats, wall sits, toe and heel walks
This first cluster builds the foundation: ankles, calves, thighs, and basic sit-to-stand strength.
1) Calf raises (flat ground, step, single-leg, weighted)
Calf raises target two key calf muscles, the gastrocnemius and the soleus. Standing calf raises hit both together, which keeps this simple.
Start on flat ground with both feet. Lift your heels, pause briefly, then lower with control. If you do not hold on, you also train balance, but holding the wall is fine if that is what keeps the movement clean.
Progressions emphasized in the video include:
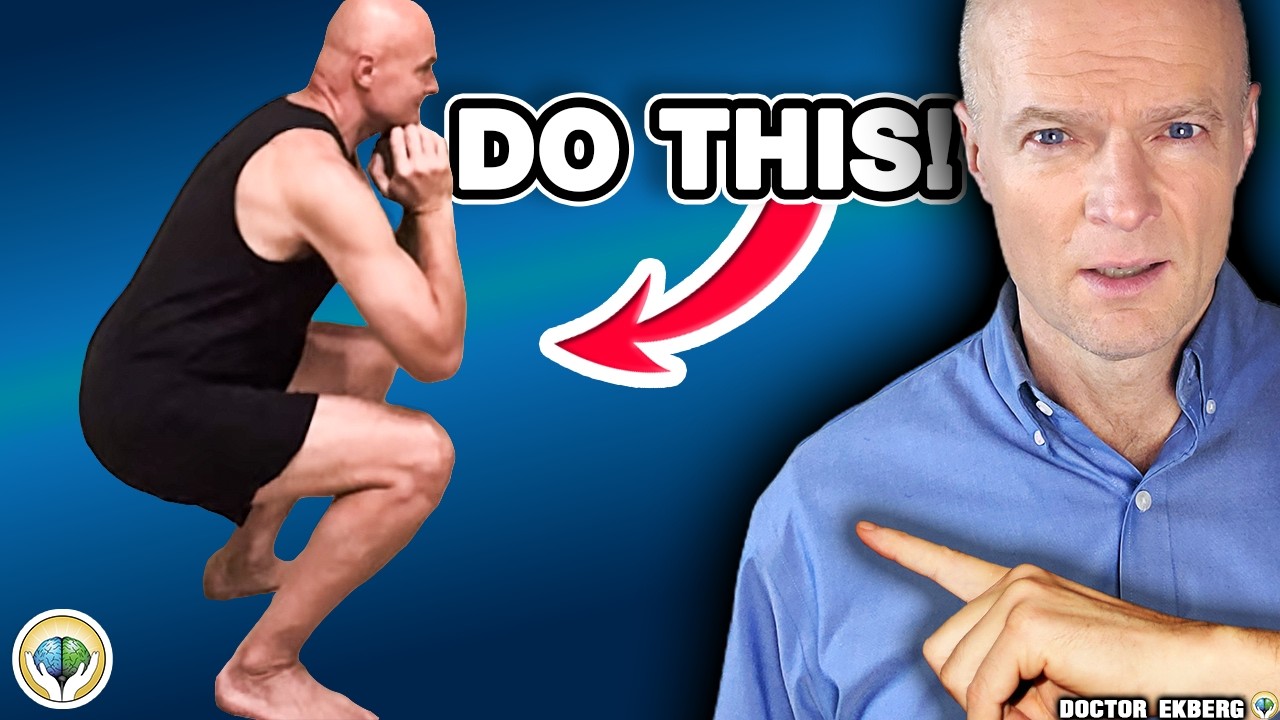
2) Squats (chair stand to goblet squat)
Squats are presented as a “big return on investment” move. They train quadriceps, glutes, hamstrings, core strength, and even flexibility.
The easiest starting point is not a gym squat. It is simply standing up from a chair, because that is one of the first daily tasks that becomes hard when legs weaken.
Use these progressions:
If ankle mobility is limiting, the video notes two options: wear shoes with a slight heel wedge, or place a small wedge under the heels. If you do, be extra careful not to drift weight onto the front of the foot.
To make squats harder, add weight. A goblet squat (holding a dumbbell in front of the chest) is highlighted because it encourages upright posture and core engagement.
A useful rule from the video is conservative and joint-friendly: do not squat deeper than you can maintain a straight back. Depth can improve over time as flexibility improves.
3) Wall sits (safe, static quadriceps work)
Wall sits are described as limited but valuable.
They are limited because they are static and mostly isolate the quadriceps. They are valuable because they can be very safe for people who do not yet trust their balance.
How to do it: back against the wall, feet forward so the shin is close to vertical. Start with a small knee bend and hold 10 to 20 seconds if you are new. Over time, work toward deeper sits, potentially around a 90-degree knee bend, and longer holds up to 1 to 2 minutes if tolerated.
4) Toe walks and heel walks (calves plus shin muscles plus balance)
Toe walking trains the calves again, but now with a moving balance demand. Heel walking trains the opposing shin muscle, the tibialis anterior.
This is also presented as a fun clinical tidbit: toe and heel walking are sometimes used as an orthopedic screen in back pain to help localize possible nerve involvement.
In practice, keep it simple. Walk on toes for a comfortable distance, rest, repeat. Then walk on heels. Many people with shin splints find heel walking can feel relieving, although if pain is sharp or worsening, it is worth checking in with a clinician.
Exercises 5 to 7: glute bridges, lateral lunges, lateral leg raises
This section shifts attention to the hips. Strong hips help knees track better, improve gait stability, and support balance reactions.
5) Glute bridges (two-leg, dynamic, single-leg)
Glute bridges train the gluteus maximus, hamstrings, and core.
Start lying on your back with knees bent and feet on the floor. Lift hips, squeeze glutes, then lower.
The video suggests two styles:
Progress to single-leg bridges by extending one leg and bridging with the other. You can do 10 reps on one side then switch, or alternate each rep.
A nuanced point in the video is worth keeping: floor exercises can be safer and easier on balance, but they are less weight-bearing, which may mean less bone-loading stimulus. That does not make them “bad,” it just clarifies their role.
6) Lateral lunges (side-to-side strength and hip mobility)
Lateral lunges are included because they train muscles that straight-ahead movements can miss, and they build hip flexibility.
Muscles named in the video include quadriceps, gluteus maximus, gluteus medius, and the adductors (inner thigh muscles that pull toward the midline).
Progressions shown:
Throughout, keep knee and foot pointing the same direction.
7) Lateral leg raises (glute medius focus) plus a standing hip drop option
Side-lying lateral leg raises are one of the cleanest ways to target the gluteus medius, with some help from the tensor fascia lata (TFL).
The main technique cue is subtle. Keep the hips stacked at about 90 degrees to the floor. When fatigue hits, many people rotate the top hip backward to lift the leg higher, but that shifts the work away from the target muscles.
A second option is a standing “hip drop” on a step. Stand on a stair or box holding a support. Let the free leg drop slightly below the step, then lift the hip back up. The movement is small, and it should stay in a pure side-to-side plane.
Exercises 8 to 10: planks, step-ups, and lunges for real-world legs
This final cluster is where the routine starts to look like life: climbing, stepping, catching yourself, and coordinating arms and legs.
8) Planks (static, but full-body useful)
Planks are described as a rare static exercise that earns its place because it trains so many muscles at once: abdominals (including obliques and transverse abdominis), glutes, quadriceps, and the broader core.
Start on elbows and knees if needed. Hold 20 seconds if that is your current level, then build toward a minute, and possibly longer with training.
Progress to elbows and toes, which increases the lever length and difficulty.
Form matters more than time. As fatigue builds, many people sag and arch the lower back. The video’s fix is to gently tuck the hips under (a posterior pelvic tilt) to keep the back flatter. If you can only hold 20 seconds with good form, that is better than 60 seconds with poor form.
Q: Should I hold planks as long as possible?
A: Longer is not always better if your form changes. Stop the set when your lower back starts to arch or your hips sag, then rest and repeat with cleaner alignment.
Keeping the hips slightly tucked and the trunk braced can make the plank safer for people prone to back irritation. If planks consistently trigger back pain, a clinician or physical therapist can help you modify the exercise.
Health educator perspective, based on the video’s form cues
9) Step-ups (stairs, boxes, knee drive, coordination)
Step-ups are framed as a favorite because they are endlessly scalable. They also build balance and coordination in a way that looks like daily life.
Start with stairs. Walk up one step at a time, using a handrail if needed. Do multiple trips.
To progress, you can take two steps at a time, or even three steps at a time if your legs are long enough and mobility allows, but do not force it.
Boxes add variety. Heights mentioned range from about 4 inches to 20 inches (10 to 50 cm). The simplest version is stepping up and placing the other foot on the box. A more complex version adds a knee drive, lifting the opposite knee toward the chest like a sprint stride.
The coordination detail is specific: pair the opposite arm with the lifted knee, like natural running mechanics. This increases the brain’s movement-planning demand, which is exactly what the video wants for fall resilience.
10) Lunges (step-back first, then walking, then load)
Lunges are presented as a powerhouse exercise, and the expert explicitly prefers a step-back lunge over stepping forward and pushing back.
The reason is mechanical. Stepping back and then driving up and forward tends to keep more load on the front heel (again, the two-thirds-on-heel cue), reduces knee stress, and increases glute involvement.
Start with bodyweight. Use a doorway or doorframe for support if balance is a concern. The video even demonstrates the arm position as if holding a doorway.
Progressions include:
A practical takeaway is that you can make lunges “hard” in multiple ways. You can add weight, but you can also increase complexity by removing support, controlling tempo, or elevating the front foot, if appropriate.
Pro Tip: For lunges and step-ups, think “heel, then hip.” Press through the front heel and feel the glute drive you up, rather than letting the knee take the whole load.
How to build a session: choose all 10 or pick 3 to start
The video’s tone is encouraging: do not get stuck on doing everything perfectly. Start where you are.
You can do all 10 exercises in one session, or pick two to four and rotate through the week. The best plan is the one you will repeat.
A simple, scalable weekly structure
Here are three ways to apply the video’s progressions without turning it into an overwhelming program.
Short sessions count. A 12-minute routine done consistently can beat a 45-minute routine that happens once a month.
How to progress without guessing
Progression in the video follows a clear logic: increase range of motion, reduce support, add complexity, then add load.
»MORE: If you want to turn these 10 exercises into a printable checklist, create a simple tracking sheet with columns for “supported vs unsupported,” “range,” and “time or reps.” Progress becomes obvious when you can check a new box.
When to pause and get help
Stop and get medical guidance if you notice chest pain, fainting, sudden shortness of breath, new numbness, new foot drop, or a sharp joint pain that does not settle with rest.
Also consider asking a physical therapist for a form check if you have a history of falls, hip fracture, or significant back pain. Small technique adjustments can make these movements safer and more effective.
Q: If I have osteoporosis, should I avoid these exercises?
A: Many people with osteoporosis still do strength and balance training, but exercise selection and loading should be individualized. Supported versions (chair squats, wall sits, step-ups holding a rail) may be a safer starting point.
Because fracture risk depends on your bone density, fall history, medications, and overall health, it is smart to review your plan with a clinician who knows your situation.
General health guidance aligned with the video’s safety-first progressions
Key Takeaways
Sources & References
Frequently Asked Questions
- How many of these leg exercises should I do in one workout?
- You can do all 10 in one session if you tolerate it, or start with 2 to 4 and rotate them across the week. The video emphasizes starting safely and building up gradually as form and confidence improve.
- Are chair squats really enough to strengthen my legs?
- Chair stands can be a strong starting point because they train a key daily task and let you practice posture and heel loading. As they get easier, you can progress to free-standing squats or add a goblet hold for more challenge.
- What is the safest way to add balance training if I feel unsteady?
- Use light fingertip support from a wall, counter, or doorframe while you practice single-leg calf raises, step-ups, or lunges. Reduce support gradually only when you can keep alignment and control.
- Why does the video prefer stepping back into lunges instead of stepping forward?
- Stepping back and then driving up and forward tends to keep more load on the front heel and shifts work toward the glutes, which may reduce knee stress for some people. If lunges cause pain, it is reasonable to ask a clinician for personalized modifications.
Get Evidence-Based Health Tips
Join readers getting weekly insights on health, nutrition, and wellness. No spam, ever.
No spam. Unsubscribe anytime.